XCode grimoire

fukurou

the supreme coder
ADMIN
new app project

create a new Xcode project,
or: file, new, project(shift + n),
choose the app template

on choose options

for your new project set interface to STORYBOARD
organization identifier example : ninja.site_name
or com.name if you have no site

choose a dir to save projects into

in the solution explorer window to the right, you can right click-> show in finder
to show the project in the containing folder

double click the project to pick up where you've left off

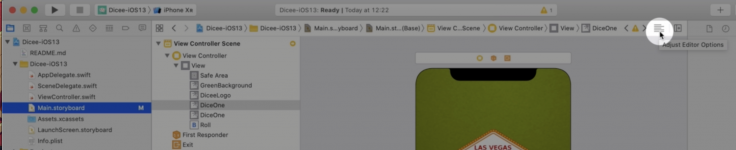
in solution explorer window (left pan):

view controller : access apps code
main : access design, the + gives access to adding views

cmd + or - : zoom in or out

style customization
Xcode, preferences, general :

system (dropbox): choose light or dark mode
change code color : themes (tab)

keyboard shortcuts.png
 
Last edited:

fukurou

the supreme coder
ADMIN
size inspector

the size inspector sets the position of view elements and their size

size_inspector.png

click + in the view controller to drag and drop views
 

fukurou

the supreme coder
ADMIN
image view


convert an icon, choose ios image and drop the images (x1 x2 x3) to
the assets folder.

next select the image view you added with the + btn in main (the UI), and
click the attribute selector.

finally select the image from the drop down box

imageview.png
 

fukurou

the supreme coder
ADMIN
running the app

for the 1024 x 1024 image you can use
canva.com

add icons :
use

to generate all icon sizes needed in assets :
assets.png


and drag them into the assets folder.

click the play button to run the app on a simulator (1st run will take a while)

running the app on a physical device :

1. update the phone and xcode to the latest version
2. add an apple developer acc :
xcode, +, select apple ID
3. sign the app :
select your project in the solution explorer, and your project under target,
click signing & capabilities tab and have "Automatically manage signing"
select you accound ID for team
if you see an err : "failed to create provisioning profile" click try again after step 4
4. connect the physical device to the mac (qith usb cable)
5. select your physical device from the top bar

(on following runs step 5 only)

running the app wirelessly :

(after step 4)
window, devices and simulators, click connect via network checkbox
(the phone and mac must use the same network)
step 5
 

fukurou

the supreme coder
ADMIN
cloning a github project to XCode


  1. on a github.com project
    code -> copy the project https url


    (^for example)
  2. open a new XCode project, clone an existing project
    or if a project is open :
    from the top tool bar, source control, clone

    paste the copied link and click clone
    to chose where the clone will have been saved


:hmm: : the LaunchScreen in the solution explorer is where the splash screen goes

search open source ios apps on github for more projects
 

fukurou

the supreme coder
ADMIN
setting background

stretch an image size on the whole device
set the content mode :
aspect fill : stretch the image on the entire view while keeping the aspect ratio

:hmm: option drag a view to duplicate it
:hmm: to add custom font drag drop it into the solution explorer below assets
and in the info file add a key value :
fonts provided by application : font_file_name.ttf

custom font.png
 

fukurou

the supreme coder
ADMIN
linking views to code

main (story board), adjust editor options, assistant (^ opt cmd enter) :

assistant.png
ctrl click drag a view to the code under :
class ViewController: UIViewController{


dragndrop.png
a popup will ask you to name the connection :

popup.png
then click connect

setting the image view picture programmatically :
Swift:
import UIKit

class ViewController: UIViewController {

    @IBOutlet weak var imgDice1: UIImageView!
   
    @IBOutlet weak var imgDice2: UIImageView!
    override func viewDidLoad() {
        super.viewDidLoad()
        // Do any additional setup after loading the view.
        imgDice1.image = UIImage(named: "DiceTwo")
        imgDice2.image = UIImage(named: "DiceSix")
}
}

:*$:if you run the code and it err : signal sigbot
it means you've modified the connections name
if you right click the story board, open as, source code
it will show the original connection name

to fix this :
1 right click the view and delete connection
2 drag the + circle from the code line connection back to the view

:hmm:overall the best way to rename a connection is to right click it's name and refactor, rename
 

Attachments

  • Screen Shot 2022-05-24 at 20.10.40.png
    Screen Shot 2022-05-24 at 20.10.40.png
    399.2 KB · Views: 0

fukurou

the supreme coder
ADMIN
button click hello world

control click drop the btn to create a btn click event (action)

dd.png

Screen Shot 2022-05-25 at 13.07.03.png

Swift:
import UIKit

class ViewController: UIViewController {

    @IBOutlet weak var imgDice1: UIImageView!
   
    @IBOutlet weak var imgDice2: UIImageView!
    override func viewDidLoad() {
        super.viewDidLoad()
        // Do any additional setup after loading the view.
        imgDice1.image = UIImage(named: "DiceTwo")
        imgDice2.image = UIImage(named: "DiceSix")
}
    @IBAction func btnRoll(_ sender: UIButton) {
        print("hello world") // this will print in the debug console which will pop up
    }
   
}
 

fukurou

the supreme coder
ADMIN
playground

this is a code only program no UI involved
file->new->playground->blank


Swift:
import UIKit

print("hello world")
print ("1+4 = \(1+4)") // string interpolation
 

fukurou

the supreme coder
ADMIN
constraints

these glue the views using rules
pin constraints.png
pin constraints ( background ) ^

set the trailing and leading attributes of the background constraints to the superview to stretchmax it all over the screen

trailing.png

leading.png
 

fukurou

the supreme coder
ADMIN
alignment constraints

these set an axis for a view so that it stays situated when the phone is rotated

alignment constraints.png

after alignment constraints was set.png
 

fukurou

the supreme coder
ADMIN
pinned constraints

if you place views without sufficient constraints it will err :


missing constraints error.png

setting alignment constraint (marked in the bottom toolbar with 2 rectangles) for the label :

alignment constraint.png

adding a pinned constraint (marked in the bottom toolbar with a square with 4 lines around it)
so the view is 30 pixels under the above constraint :


pinned constraint.png

:hmm: note you can choose the view instead of the safe area from the pinned constraints drop down
(where the number value is, 30 in the picture)
 

Attachments

  • Screen Shot 2022-05-30 at 11.54.36.png
    Screen Shot 2022-05-30 at 11.54.36.png
    24.1 KB · Views: 0
Last edited:

fukurou

the supreme coder
ADMIN
embedding views

method 1 :add a UIView (+ btn from upper tool bar) and drag a view in to it :

embedding view.png

method 2 : select views->editor->embed in->view
method 3 :select views and then click the embed button

embed btn.png
an error will prompt you to set the containing views constraints or a constraint embedding it:

no constraints err.png
 

fukurou

the supreme coder
ADMIN
stack view constraints

naming views :

naming views.png


embed in a stack view

embed in a stack view.png

finally add pin constraints to the stack view and set the
pins relative to the safe area :


safe area.png
 

fukurou

the supreme coder
ADMIN
setting stack view attributes

set distribution to fill equally
fill stackView equally.png
and play with the spacing :
spacing.png

set embedding views background to default (which is see through) :

see through embedding views.png
 

fukurou

the supreme coder
ADMIN
play audio

Swift:
import UIKit
import AVFoundation

class ViewController: UIViewController {
    
    var player: AVAudioPlayer!

    override func viewDidLoad() {
        super.viewDidLoad()
    }

    @IBAction func keyPressed(_ sender: UIButton) {
        playSound()
    }
    
    func playSound() {
        let url = Bundle.main.url(forResource: "C", withExtension: "wav")
        player = try! AVAudioPlayer(contentsOf: url!)
        player.play()
                
    }
}
 
Top